
Step-By-Step Instructions for Option A Flat-Sewn Bag with Divided Body Compartment
|
Below are the detailed instructions for the Flat-Sewn Bag. Or you can download a printable file here:
|
| ||
1. (The welt (H) is not used for the flat-sewn option – See Customization Options - coming soon)
2. Before beginning, burnish the grain sides of all leather pieces with canvas or sheep wool. (If planning on dying, burnish after pieces are dyed.) NOTE: Also burnish the edges of leather pieces. To do this lightly wet an edge and smooth with canvas, bone, the handle of your stitching awl, etc until the edge becomes glossed and smooth. Burnish before sewing the following:
Making the Bag Body
3. Create stitch lines. Create stitch lines using dividers.
4. Making the stitch marks on the pocket. After making the stitch lines, now make your stitch marks. If the leather has dried you may need to lightly rewet for this procedure.
5. Sewing the pocket. Position the pocket (E) grain side up on the flesh side of the Back (A). The top of the pocket should be about 3 ½ inches from the top of the back and centered. Bring each top corner of the pocket inward about 1/8 inch to create a slight bulge. Now mark the location of the top corners on the flesh side of the back with one leg of your dividers, pencil mark, etc, so you can reposition the pocket after glue has been applied. Add a very small amount of glue to the flesh side of the outer edges of the pocket (not the entry area) and firmly press the pocket onto the back according to your location marks around the glued edges. After secure and dry, position these two pieces in your stitching clamp with the pocket facing your dominant hand and opening facing away from you. The corner stitch line mark should be just above the clamp. Begin stitching from this corner all around to the other corner to sew the pocket onto the back of your bag. (See Recommended Resources for saddle stitching instructions)
6. Make stitch marks along the curved perimeter of the front (B) following your stitch line.
7. Sewing the body. Position the back (A) flesh side up and the divider (D) grain side up on top of the back. Secure with glue. Once dry, add the front (B) grain side up on top and secure with glue or tacks. Once dry, place body into clamp and stitch the body together.
8. Lightly wet the joined edges and burnish the 3 pieces together using the handle of your stitching awl. You can also use canvas, bone, etc. This creates a smooth join.
9. Sewing the flap. Wet the top edge of the back on the flesh side and fold over to have an approximate 9/16 - 5/8 inch fold width. Position the flap (C) under this fold fully against the fold and glue. Reset dividers to approximately 3/8 inch, and mark a stitch line with the other divider leg along the top of the fold. Position the bag in the stitching clamp with the flap open and body back facing your dominant hand, stitch line parallel to the floor. Stitch the flap to the bag.
Adding the Straps
10. Starting the straps. Wet the strap at the buckle-turn and fold making the tongue slot centered on the fold (Figure 1-a). Set dividers to 5/32 inch. Make a stitch line on the short end of the buckle turn (down both sides and around the rounded end). (Figure 1-b). For decorative purposes, you can also continue this line along the length of both strap pieces (Figure 1-c). It also is beneficial to wet the edges of the straps (Figure 1-d) and pull them through a piece of canvas or brown paper bag to burnish the edges (Figure 1-e).
2. Before beginning, burnish the grain sides of all leather pieces with canvas or sheep wool. (If planning on dying, burnish after pieces are dyed.) NOTE: Also burnish the edges of leather pieces. To do this lightly wet an edge and smooth with canvas, bone, the handle of your stitching awl, etc until the edge becomes glossed and smooth. Burnish before sewing the following:
- Top edge of body front
- Top edge of internal divider
- All edges of pocket
- Sides and bottom edges of front flap
Making the Bag Body
3. Create stitch lines. Create stitch lines using dividers.
- Set dividers to approximately 5/32 inches. Lightly wet leather. Scribe a stitch line on the following leather pieces on the grain side:
- Pocket (E) and Front (B) – curved perimeter
- Decorative lines could be added based on personal preference to the top of the Pocket (E), Front (B), Divider (D), as well as the curved perimeter of the Flap (C). (Note: These are not stitch lines, but are decorative options only)
4. Making the stitch marks on the pocket. After making the stitch lines, now make your stitch marks. If the leather has dried you may need to lightly rewet for this procedure.
- Continue to keep the dividers at 5/32 inch. Starting at one corner of the pocket (E), let one leg of the divider hang over the edge and press into the leather with the other leg. Now place the other leg of the divider into the mark you have made, and press the other leg into the leather creating the next stitch mark. Continue this procedure along the perimeter stitch line until reaching the other corner of the pocket entrance. The last few stitch marks may need adjustment by eye to give a uniform appearance.
5. Sewing the pocket. Position the pocket (E) grain side up on the flesh side of the Back (A). The top of the pocket should be about 3 ½ inches from the top of the back and centered. Bring each top corner of the pocket inward about 1/8 inch to create a slight bulge. Now mark the location of the top corners on the flesh side of the back with one leg of your dividers, pencil mark, etc, so you can reposition the pocket after glue has been applied. Add a very small amount of glue to the flesh side of the outer edges of the pocket (not the entry area) and firmly press the pocket onto the back according to your location marks around the glued edges. After secure and dry, position these two pieces in your stitching clamp with the pocket facing your dominant hand and opening facing away from you. The corner stitch line mark should be just above the clamp. Begin stitching from this corner all around to the other corner to sew the pocket onto the back of your bag. (See Recommended Resources for saddle stitching instructions)
6. Make stitch marks along the curved perimeter of the front (B) following your stitch line.
7. Sewing the body. Position the back (A) flesh side up and the divider (D) grain side up on top of the back. Secure with glue. Once dry, add the front (B) grain side up on top and secure with glue or tacks. Once dry, place body into clamp and stitch the body together.
8. Lightly wet the joined edges and burnish the 3 pieces together using the handle of your stitching awl. You can also use canvas, bone, etc. This creates a smooth join.
9. Sewing the flap. Wet the top edge of the back on the flesh side and fold over to have an approximate 9/16 - 5/8 inch fold width. Position the flap (C) under this fold fully against the fold and glue. Reset dividers to approximately 3/8 inch, and mark a stitch line with the other divider leg along the top of the fold. Position the bag in the stitching clamp with the flap open and body back facing your dominant hand, stitch line parallel to the floor. Stitch the flap to the bag.
Adding the Straps
10. Starting the straps. Wet the strap at the buckle-turn and fold making the tongue slot centered on the fold (Figure 1-a). Set dividers to 5/32 inch. Make a stitch line on the short end of the buckle turn (down both sides and around the rounded end). (Figure 1-b). For decorative purposes, you can also continue this line along the length of both strap pieces (Figure 1-c). It also is beneficial to wet the edges of the straps (Figure 1-d) and pull them through a piece of canvas or brown paper bag to burnish the edges (Figure 1-e).
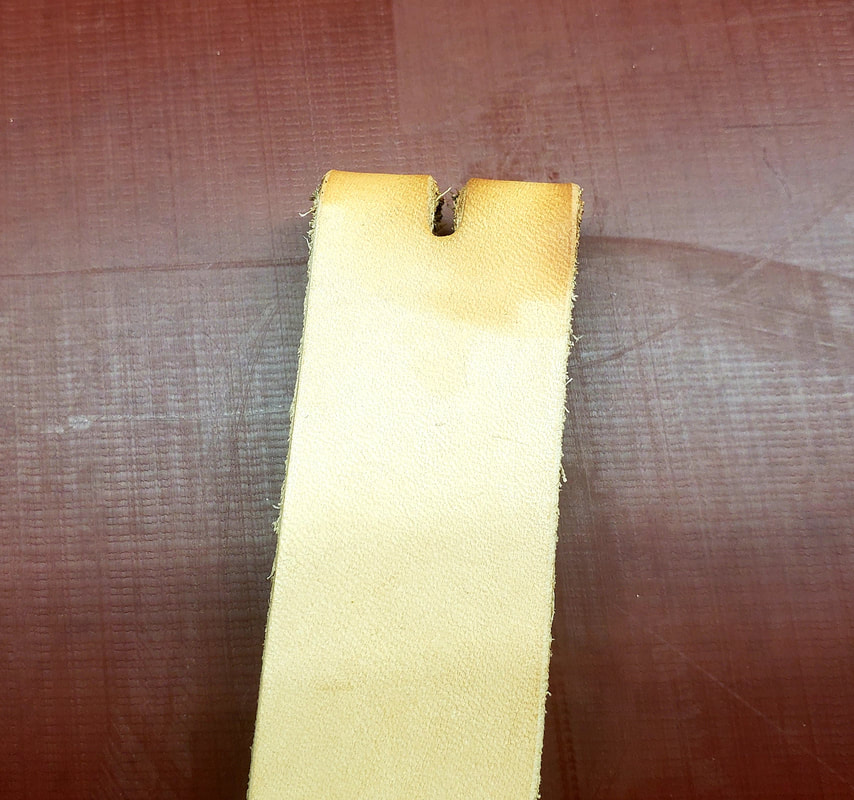
Figure 1-a
|
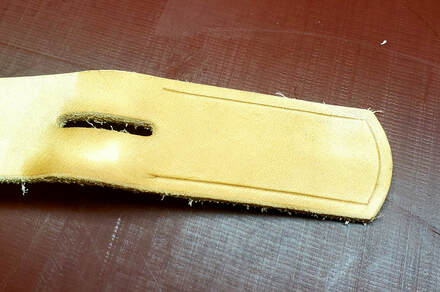
Figure 1-b
|
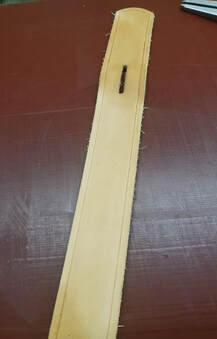
Figure 1-c
|
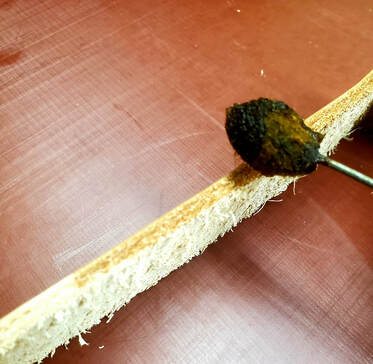
Figure 1-d
|
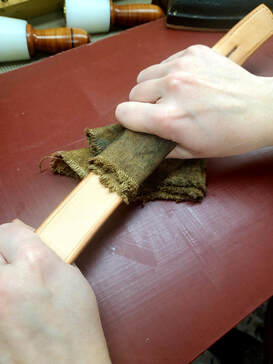
Figure 1-e
|
11. Creating stitch marks on buckle turn. Make stitch marks following the stitch line, beginning evenly with the end of the buckle tongue slot on the short side of the buckle turn. (Figure 2). Continue stitch marks around the short side and back up to the other side, ending evenly with the buckle tongue slot.

Figure 2
12. Attaching buckle for stitching. In one hand hold the strap with the end of the buckle turn grain side up facing away from you. In the other hand, hold the buckle right-side up with the tongue facing away from you (Figure 3-a). Insert the end of the strap underneath and up through the back of the buckle (Figure 3-b). Move the tongue into the tongue slot. Take the end of the strap and insert it down into the front of the buckle (Figure 3-c). Fold the buckle turn back on itself. This should place the buckle in its correct position for sewing (Figure 3-d). The buckle turn should then be glued or tacked in place for stitching.
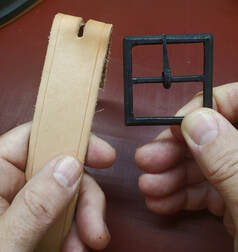
Figure 3-a
|
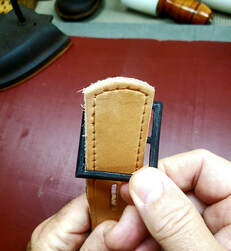
Figure 3-b
|
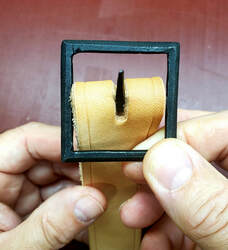
Figure 3-c
|
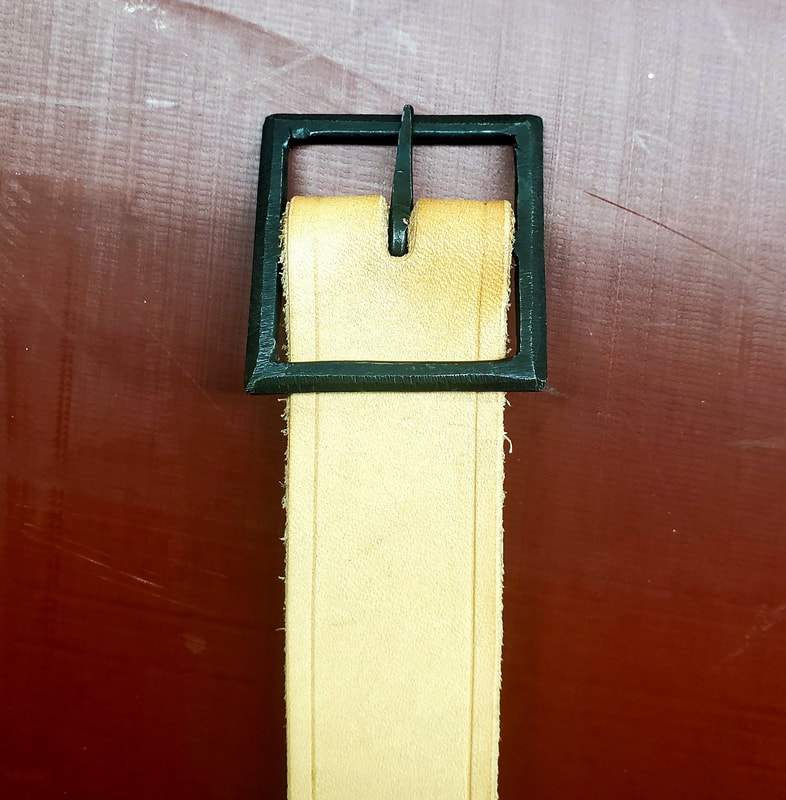
Figure 3-d
|
13. Sewing the buckle. Place the buckle turn in the stitching clamp with the stitch marks facing your dominant hand with the buckle facing away from you (Figure 4). Begin stitching behind the buckle, and stitch all the way around back to the other side of the buckle.
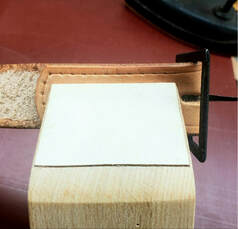
Figure 4
14. Sizing the straps. Before attaching straps to the bag, you can easily size the strap to yourself by attaching the two-piece strap together. Place the billet-end of the strap into the buckle, putting the tongue through the middle hole and secure the buckle. Arrange the strap over your shoulder as if you were wearing the bag. Locate the side of the strap with the buckle – this side is the fixed standard. Adjust the strap to ~1 inch below the top of the bag. Find where you wish the top of the bag to ride on your person, and bring the other side of the strap around to the top of the bag. Make a mark here (~1 inch below the top of the bag). Cut at this mark, making it square with the strap.
15. Making the stitch marks for attaching the straps. For both strap ends to be attached to the bag, lightly wet the flesh side of each end and make stitch lines on the flesh sides using dividers at 5/32 inch (Figure 5-a). These lines should encompass the end and 1 inch down on each side of the straps. Now use the dividers to mark each stitch along the path of these stitch lines (Figure 5-b). The traditional method of stitching should be to punch one hole at a time as you stitch. However, in some applications it is best to pre-punch your holes. In this case, it is beneficial to pre-punch your straps only prior to applying to the bag. To do this, place the strap flesh side up on a surface that can absorb the penetration and length of the awl (Figure 5-c). Good examples of this would be a soft piece of wood or a thick rubber mat. Ensure the awl is perpendicular to the strap and pre-punch your stitch holes.
15. Making the stitch marks for attaching the straps. For both strap ends to be attached to the bag, lightly wet the flesh side of each end and make stitch lines on the flesh sides using dividers at 5/32 inch (Figure 5-a). These lines should encompass the end and 1 inch down on each side of the straps. Now use the dividers to mark each stitch along the path of these stitch lines (Figure 5-b). The traditional method of stitching should be to punch one hole at a time as you stitch. However, in some applications it is best to pre-punch your holes. In this case, it is beneficial to pre-punch your straps only prior to applying to the bag. To do this, place the strap flesh side up on a surface that can absorb the penetration and length of the awl (Figure 5-c). Good examples of this would be a soft piece of wood or a thick rubber mat. Ensure the awl is perpendicular to the strap and pre-punch your stitch holes.
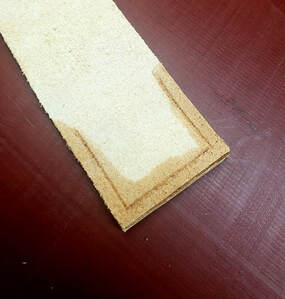
Figure 5-a
|
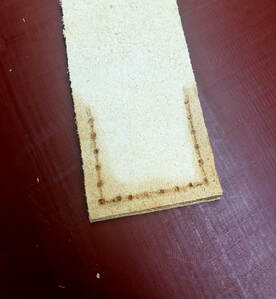
Figure 5-b
|
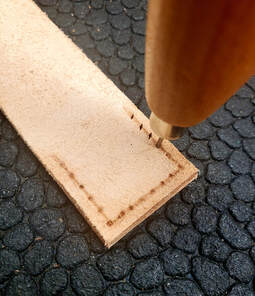
Figure 5-c
|
16. Determine right- vs left-hand carry. Before stitching the straps, decide which side the bag is to be carried and whether buckle is to be worn in the front or in the back.
17. Attaching the straps. It is easier to attach and stitch one strap piece at a time. For a beginner, contact cement or strong glue would be beneficial while stitching. The outer edge of each strap part should be approximately 5/8 inch in from the side of the back of the bag. Secure one strap part and let dry. Now using the awl, punch through each existing hole in the strap creating a corresponding hole into the back of the bag. Make sure the flap and your fingers are out of the way during this procedure. Stitch this strap to the bag, and repeat this step for the other part of the strap.
Finishing the Bag
18. Apply a light coat of pure neatsfoot or a quality olive oil to the grain sides of the bag. Allow at least 24 hours for the oil to migrate. If a spirit dye was used to dye the bag, it will be necessary to then apply a protective coating to prevent bleeding of the dye. There are commercial solutions available, such as Tan-Kote, Resoline, etc. A home version can be created by mixing ½ water to ½ Mop-N-Glow and applying to the dyed grain sides. Resoline and the Mop-N-Glow applications are acrylic and will prevent further nourishment of the bag. Tan-Kote will allow penetration of leather conditioners in the future. For maintenance, Montanta Pitch Blend is a good, general purpose leather conditioner.


